How it works
Caching is a key feature in FASTBuild that allows machines to share the result of previous builds with each other avoiding unnecessary recompilation of the same code and resulting in a drastic total build time reduction. If you are familiar with ccache… this may sound like old news!
In a typical scenario we can imagine a central build machine that continuously builds a project and writes the result changed object files into the shared cache. Later when the team members need to re-compile that same version of the source files, instead of recompiling them FASTBuild will detect the cache-hits and transfer the cached results which can be is significantly faster.
Here is an example of build times both with and without the FASTBuild caching feature from the FASTBuild website:
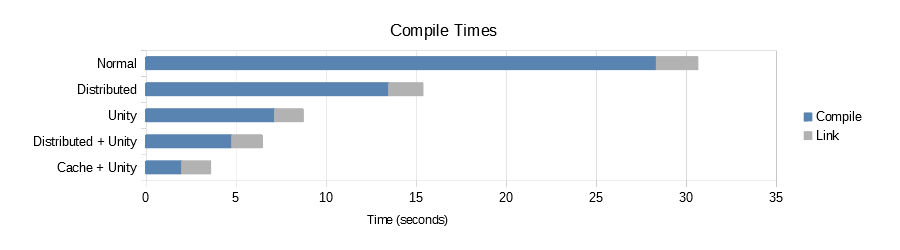
Note that the build caching is not offered on commercial products like Incredibuild, making it a unique feature to FASTBuild!
Caching setup
The setup is straightforward and consists of 3 steps:
1) Create a shared cache folder.
2) Set the CachePath attribute in the Unreal FastBuild.cs to the network location selected in step 1).
3) Launch a new build and observe the cache folder being populated.
Assuming we’re running on Windows, here are a few more details about each step:
1. Create the shared cache location:
a) Choose a computer that is available on the local network, i.e. it is accessible by all computers participating in the build.
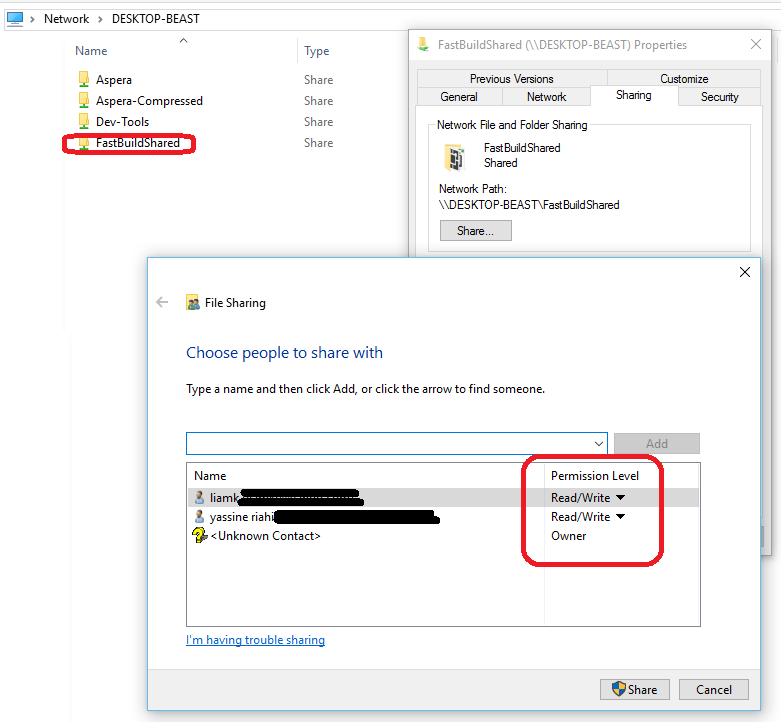
b) Create a new folder named something like FASTBuildShared. This folder will contain all FASTBuild shared files. Enable Windows sharing on that folder.
c) Make sure to give Read/Write permissions to all users/machines that need to access the central cache.
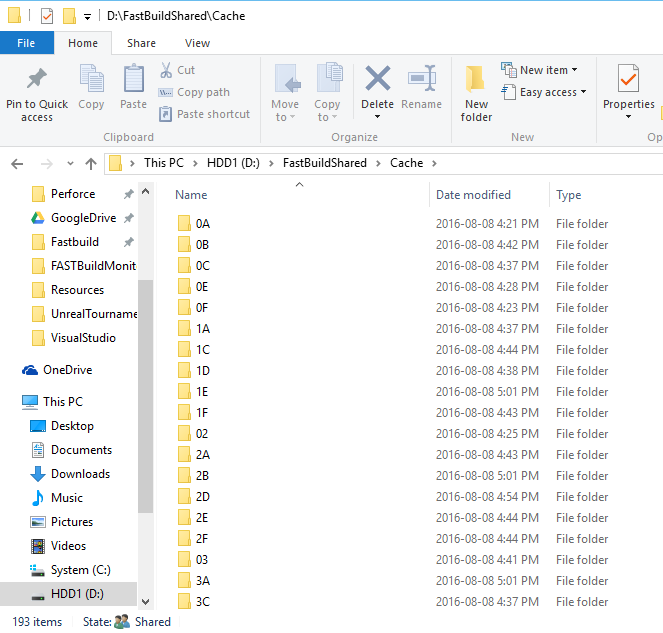
d) Create a sub-folder called Cache, this will contain our FASTBuild cache structure.
Tips and Troubleshooting:
- Distributing builds through WIFI can result into network saturation, slow transfers and timeouts which can negatively impact build times.
- The shared machine needs to have enough available storage space to host the cache. The size of the cache depends on multiple factors like: the size of the codebase, the number of files changed in each new build that is pushed to the cache, the number of builds that are pushed (written to) the cache and the platform that we are building against. For instance a full Windows UnrealTournament build of a single configuration uses approximately 2GB.
- The cache machine should have good hard drive IO performance, or a very large amount of RAM, particularly if it will serving many files to many computers simultaneously.
- If some computers are not using the cache as expected, be sure to test the access to the shared brokerage folder from other computers: for example try to create and delete a folder to verify that you have full access rights.
2. Specify the cache location on the build clients:
There are 2 ways of specifying the cache location:
a) Local option: Through the Unreal FastBuild.cs options:
You can simply edit the CachePath attribute and specify the network location created in step 1).
private static string CachePath = "\\\\DESKTOP-BEAST\\FastBuildShared\\Cache"; // Optional: Location of the FASTBuild shared cache (local or network location).b) Global option: Through system environment variables:
Open the Windows Environment Variables Settings (System->Advanced system settings->Environment Variables) and add a new entry called FASTBUILD_CACHE_PATH. The value needs to be set to the network location created in step 1).
In our example: \\DESKTOP-BEAST\FastBuildShared\Cache
3. Build with the FASTBuild cache enabled:
Now that we have created the central shared cache in Step 1 and configured its location on every build client in Step 2, we can start a new build.
If everything is OK you should see the cache structure being gradually populated with directories and files:
After the first build is completed, try to rebuild the same code once again and you should notice that the build client is able to retrieve build results from the cache. In the Visual Studio output window you should start seeing logs that look like:
5> 4> Obj: D:\Dev-Projects\Unreal4\UnrealTournament\Engine\Intermediate\Build\Win64\UE4\Development\MediaAssets\Module.MediaAssets.cpp.obj <CACHE>
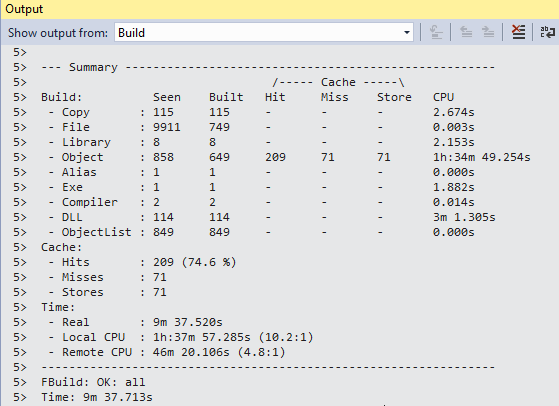
The FASTBuild Summary is useful to inspect how the cache performed in the last build session:
Tips:
- The CacheMode setting is used to specify the behavior of the current FBuild.exe instance in regards to the cache. There are 3 modes: ReadOnly, WriteOnly and ReadWrite. Depending on the role of each machine in your distributed build system you might want to set the CacheMode accordingly. In a typical scenario the central build machine would run in a ReadWrite mode while other build clients would run in ReadOnly.
- The cache mode can also be set through the FASTBUILD_CACHE_PATH environment variable (refer to the FASTBuild documentation for more details).
- On the Windows platform (for different technical reasons that are explained in the FASTBuild documentation), running in Write cache mode makes the build slower as its not able to use some build time optimizations (mainly because of the preprocessor cost and not being able to use PCHs). Consequently it is recommended that only a limited number of machines run in Write mode (i.e. central build machines) while all other clients (i.e. programmer’s machines) would run in Read-Only mode allowing them to use the latest cached files and a faster compilation of the non cached files.
hi, I have a question about the cache,
is there any way to clean some of cache which are out fo date
Hi Ruyi, I’m not sure if there’s anything built into FASTBuild for that, I haven’t seen any options that would control that. There may be something to manage it if you dig through the code, or alternately running a little script that deletes older files from the cache folder on the build machine.
Per this thread: https://github.com/fastbuild/fastbuild/issues/245
It confirms that Fastbuild has no builtin cache management options. One has to implement his own cache management script using custom policies like Liam is suggesting.